If you are a beginner you should ask some questions about the terminology: What is an aperture? What is a shutter speed? What is ISO? How to take a nice shoot?
Adjusting your camera can help you take a nice picture. These are some of the most important settings on your DSLR camera. If you don't know how to adjust them, make sure you read our explanations below.
So here are the three settings which will affect your image the most! These are the things that make photography art or make it look like trash. We recommend you get used with these three before learning about others if you really want to be good at photography.
Exposure elements
ISO: the level of sensitivity to light. ISO 100 is a low ISO and would be best for bright sunny days or brightly lit indoor scenes. Higher ISOs (such as 800, 1600, 3200) are generally used in darker settings where you need a faster shutter speed - but higher ISOs mean more "noise", which means your images will have a grainier quality after being processed.
Aperture: also called f-stops, this controls how much light comes into the camera by adjusting the size of the lens opening. The larger the aperture number (f/2.8), the smaller opening there is in your lens - meaning that more light is let in when you take a photo.
Shutter speed: how long the shutter is open to allow light into the camera. This is measured in seconds (1/60th of a second) or fractions of a second (1/4000th of a second). The longer the shutter is open, the more light will come in and be captured by the camera sensor.
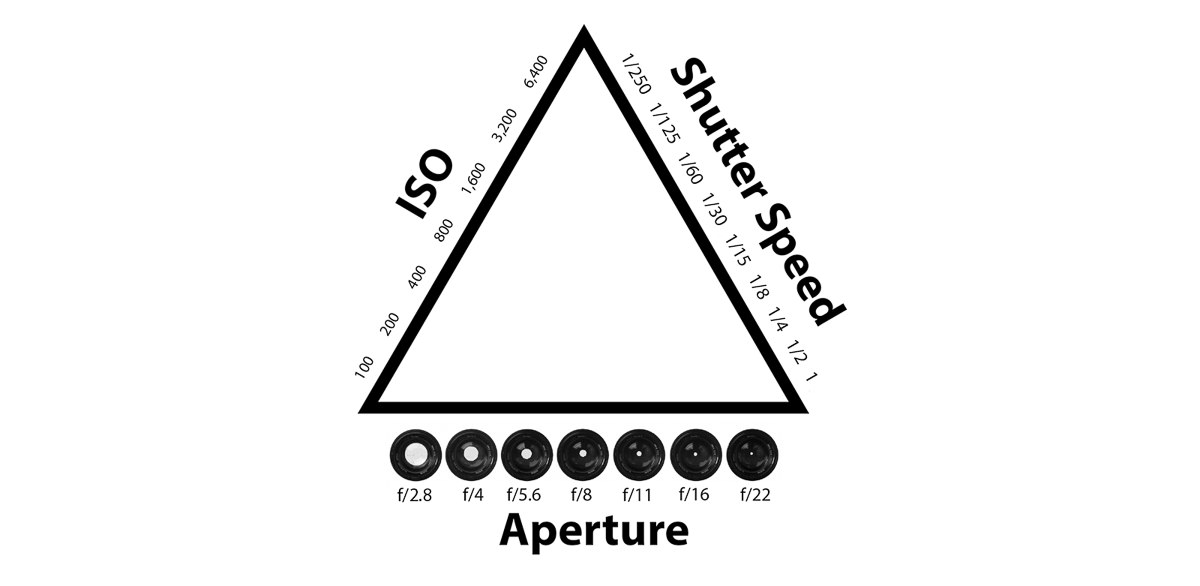
Exposure triangle - what is it?
The exposure triangle is the relationship between ISO, shutter speed, and aperture.
How it works: The three types of settings (aperture, shutter speed, and ISO), when combined at different settings, create a total exposure. Combining these elements according to what is needed for each image can allow you to attain just the right amount of light - enough so that everything looks as it should in your photograph.
Let's say you're photographing a person on a bicycle. You want to make sure there's detail in both the sky and the subject themselves, but unless you use an extremely fast shutter speed (1/4000th of a second or faster) using either aperture or ISO will result in blurred photos: choosing too small an aperture (f/16) for a sunny day would leave the sky overexposed and add too much light to the bike while choosing an ISO of 100 might not be sensitive enough to capture the subject in low enough light.
However, you can use shutter speed and aperture together to get just the right amount of exposure, by manipulating them in relation to each other: if you set your shutter speed at 1/400th of a second and choose f/8 (for example), then that will give you the correct balance between capturing light from both the sky and your subject's face without overexposing or underexposing any part.
You can also use ISO in this way: for instance, if you set your shutter speed at 1/400th of a second and choose f/8 (for example), then that will give you the correct balance between capturing light from both the sky and your subject's face without overexposing or underexposing any part.
You can also use ISO in this way: for instance, if you set your shutter speed at 1/400th of a second and choose f/8 (for example), then that will give you the correct balance between capturing light from both the sky and your subject's face without overexposing or underexposing any part.
How to measure ISO, aperture, and shutter?
Aperture, shutter speed, and ISO are measured in numbers called "stops". Each stop represents double the light of the previous stop - for instance, changing your aperture from f/8 to f/5.6 will result in one stop less light coming into the camera because there is a smaller hole letting light through.
Similarly, each time you halve the shutter speed (from 1/100th of a second to 1/200th of a second), or double it (from 1/100th of a second to 2 full seconds) you have halved or doubled the amount of light entering the lens.
Similarly, each time you halve the shutter speed (from 1/100th of a second to 1/200th of a second), or double it (from 1/100th of a second to 2 full seconds) you have halved or doubled the amount of light entering the lens.
What does this mean for my photos?
When mastering the exposure triangle, you'll want to start with your aperture because this directly controls how much light comes in through the lens - meaning that it will be easier to figure out what shutter speed and ISO settings are needed if you know how big or small your aperture is set.
After working with one side of the triangle by choosing an aperture setting, you can use your metering modes and histogram to help determine which settings to use on either end of the triangle: if using spot metering, take a photo and review the exposure info to see if it's underexposed (if the image is too dark) or overexposed (if the image was too bright).
If spot metering shows that your image is underexposed, then set your shutter speed to double what you used before; if using spot metering shows that your image is overexposed, then switch the dial to show a lower ISO.
After working with one side of the triangle by choosing an aperture setting, you can use your metering modes and histogram to help determine which settings to use on either end of the triangle:
- if using the center-weighted mode, take a photo and review the exposure info to see
- if it's underexposed (if the image is too dark) or overexposed (if the image was too bright).
- If center-weighted mode shows that your image is underexposed, then set your shutter speed to double what you used before;
- if center-weighted mode shows that your image is overexposed, then switch the dial to show a lower ISO.
If using matrix metering mode, take a photo and review the exposure info to see if it's underexposed or overexposed. If matrix metering mode shows that your image is underexposed, then set your shutter speed to double what you used before; if matrix metering mode shows that your image is overexposed, then switch the dial to show a lower ISO.
Histograms are also great for checking exposure and can be used in conjunction with metering mode to help you get your photos just right.
What does underexposure mean?
Underexposure means that there isn't enough light hitting your camera's digital sensor for it to capture correctly. As a result, images taken in underexposed conditions will be too dark (or "underexposed") and may lack detail in the shadow areas.
What does overexposure mean?
Overexposure means that there is too much light hitting your camera's digital sensor for it to capture correctly. As a result, images taken in overexposed conditions will be too bright (or "overexposed"), and may have lost all detail in the highlight areas.
Histograms
A histogram is a visual representation of the tonal range of an image. It shows how many pixels are present at each tonal value, from pure black on the left, to pure white on the right. This can be helpful for checking exposure, as it allows you to see if any parts of your image are being clipped (overexposed to the point where all detail is lost).
How should you deal with the exposure triangle?
There's no one-size-fits-all answer to this question - it all depends on the photo you're trying to take, and the look you're going for. But by understanding how aperture, shutter speed, and ISO work together, you'll be better equipped to make exposure decisions that will help you capture the photos you want, with less fuss.
How to train your eye?
Our eyes are incredibly good at seeing the world around us, so it makes sense to train our eyes to help us get better at photography. One of the easiest ways to do this is by paying attention to how your camera's metering modes work, and what they mean for your image - then you can practice taking photos with different settings until you find one where you're happy.
Another great way of training your eye is by looking closely at other photographers' work, especially those whose style appeals to you - look closely at their images and see how they've balanced all three elements in order to achieve the effect that they wanted.
The camera's meter is designed to expose a shot as 'properly' as possible under average conditions.
This often means that the camera will try to keep the background dark, which is why many photos are underexposed if they have a lot of very bright areas. If you want your image to be brighter than what the meter suggests, choose an aperture setting with more exposure - this will blow out anything in the background so it appears as pure white, but you can use post-processing software like Adobe Lightroom or Photoshop to bring back some of that detail later on.
Final words
By understanding how the exposure triangle works, you'll be able to take more control over your photos and achieve the results you're looking for. The best way to learn is by experimenting with different settings and seeing what works best for each individual photo. So get out there and start shooting!
Just remember that while every scene is different, the concept of aperture, shutter speed, and ISO are universal. The more time spent learning about which combinations work best in certain lighting situations, the easier it will become to train your eye to recognize them when they appear during a shoot!