Utilizing zooming techniques in photography is an excellent method to infuse impact and excitement into your photos.
By adjusting the camera's proximity to the subject, either by moving closer or farther away, you can generate a feeling of depth and drama, elevating your images above the ordinary. Here are four straightforward steps to assist you in embarking on this creative journey.
What Do You Need to Get Started with Zoom Burst Photography?
Location
The core sections of bridges, symmetrical structures, and sites with striking colors and textures are all excellent choices for zoom burst photography.
While shooting during the day, additionally, pine woods or other natural places with symmetrical rows of trees or an abundance of tree canopies may make great subjects.
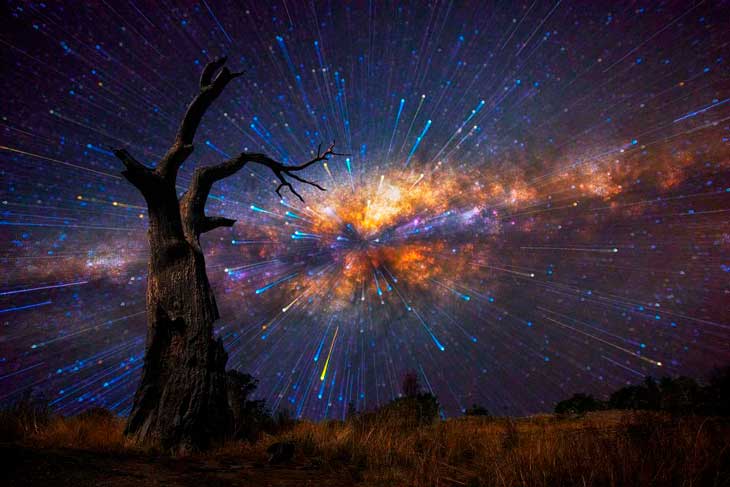
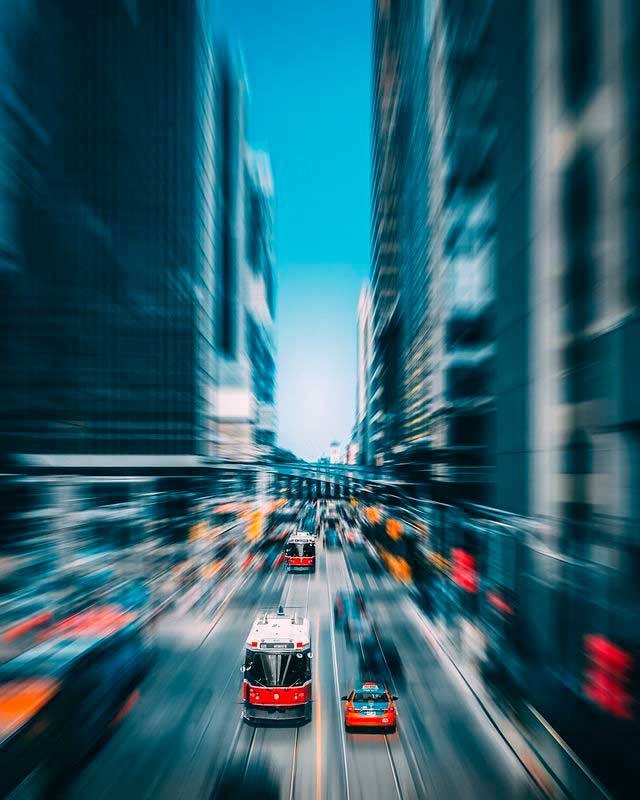
The zoom burst technique may be used to capture a variety of nighttime photography scenes, such as the night sky, lighted cityscapes, towering, well-lit buildings, and illuminated bridges.
Images that are fascinating and aesthetically compelling can be produced in settings with contrasting or different-colored lighting.
Time of the Day
Any time of day is suitable for zoom burst photography, although it is best to avoid the bright noon sun because it might provide too much light for long exposures.
Neutral density filters can be used to control the amount of light reaching the camera sensor, allowing for long exposures even under strong lighting.
Gear Required
To engage in zoom burst photography, you will require the following equipment and tools:
- A DSLR or mirrorless camera
- A zoom lens equipped with a manual zoom ring; opt for a zoom lens with a moderate zoom range such as 18-55 MM for APSC sensor cameras or 24-70 MM for full-frame cameras. This range is sufficient to achieve the desired effect.
- A sturdy tripod; while it is possible to shoot handheld with shutter speeds like 1-60 seconds or 1-30 seconds, using a tripod is essential when precision and uniformity in the zoom effect are necessary.
- Utilize the in-camera timer function to delay the shutter release, or employ a cable remote release to prevent camera shake caused by the shutter release.
The Basic Camera Settings You Will Need for Zoom Blur

- Utilize manual mode on your camera.
- Opt for aperture values ranging from F-7 to F-16. If your lens performs well with narrower apertures, consider going down to F-22 if necessary for your shot.
- For daytime shots, set the lowest ISO possible to achieve longer exposure times and reduce noise.
- In low-light conditions, such as nighttime shots, you may need to increase the ISO to compensate for limited light. However, be cautious of introducing noise into your images.
- Adjust the shutter speed to approximately one second or slightly faster/slower, depending on your creative intent. Typically, using a shutter speed ranging from 1 second (daytime) to 5 seconds (nighttime) is a good starting point for achieving stunning zoom burst effects.
- For quick handheld shots or specific effects, consider shorter shutter speeds like 1-30 seconds or 1-60 seconds. However, keep in mind that the shutter must remain open while you perform the zooming action. Be swift and steady to complete the zooming process within the chosen exposure time. If the exposure time is too short, the zoom burst effect may be limited.
- Always designate the focal point as the origin from which the zoom blur radiates outward for the best results.
Elements That Work for Zoom Burst Photography
Ensure you select the right composition and elements to create captivating zoom burst photography. This skill involves choosing subjects that can benefit from this effect. Consider the following elements to frame and capture using this technique:
- Walls with pronounced textures
- Single flowers with contrasting colors compared to the background
- Trees in wooded areas
- Sunlight streaming through the trees
- Urban landscapes including tall buildings
- Portraits; you can produce stunning portraits with this method.
- Bridges
- Ferris wheels
- Elements with symmetrical forms or patterns
- Glass windows and doors that allow light to pass through
- Experiment with night sky photography, which may require higher ISO settings and an exposure time of at least 30 seconds to achieve the zoom burst effect.
- Incorporate the zoom burst effect with neon signs, LED lights, fairy lights, or cityscape and building lights at night.
- To convey a sense of speed, you can capture images of sports people or vehicles in motion. Zoom burst photography effectively conveys movement and busyness, conveying a story to the viewer.
- Experiment with focus tracking for moving subjects; explore various images on platforms like Click to gain inspiration.
- Remember that the provided list serves as a starting point for your zoom burst photography compositions. Do not limit yourself to these subjects; instead, venture out and experiment with other elements you encounter. Often, you would not fully grasp the end result until you have captured the shot.
Step-by-Step Guide to Zoom Burst Photography
- Set your camera to manual mode and mount it on a tripod, recommended for precise, straight-line zoom burst effects. If you are aiming for more abstract zoom effects, you can shoot handheld but avoid any back-and-forth movement.
- Compose your image by using the widest focal length on your lens to determine which elements to include in the frame. While still subjects work well, moving subjects can yield unique effects.
- Look for vibrant colors during composition to enhance the visual impact of your zoom burst photography.
- Zoom in completely and manually focus on your chosen subject. Adjust your exposure settings based on this focus point.
- Once you have set your focus and exposure, avoid any further camera or subject movement or focus adjustments to prevent blurry images.
- Zoom out to the widest or shortest focal length on your lens in preparation to take the shot.
- Choose an appropriate shutter speed to allow enough time for the zooming process from the wider to the narrower focal length.
- Release the shutter and smoothly rotate the zoom ring; zoom in from the widest focal length to the narrowest while the shutter remains open. This ensures a smooth recording of the zoom effect.
- As you approach the end of the exposure at the longest zoom value, just before the shutter closes, and when the subject is in focus, briefly pause the exposure for a few milliseconds to capture the focused subject sharply.
- If your goal is to create an abstract image with limited sharp or well-defined details, continue zooming throughout the entire exposure without pausing at the end. During daytime shooting, a tripod may not be necessary if the exposure time does not exceed 1-30 seconds to 1-60 seconds or a maximum of 1 second.