Photoshop skills are never complete without the ability to blend two images together. This is a key skill for creating composite images and for retouching photos. In this tutorial, we'll show you how to merge two photos in Photoshop so they look seamless.
How to blend two images in Photoshop?
Here is a quick guide on how to blend two images in Photoshop. We will show you step-by-step how to create a composite image, as well as how to retouch photos.
Use a layer mask
This method is best suited for images with similar colors and tones.
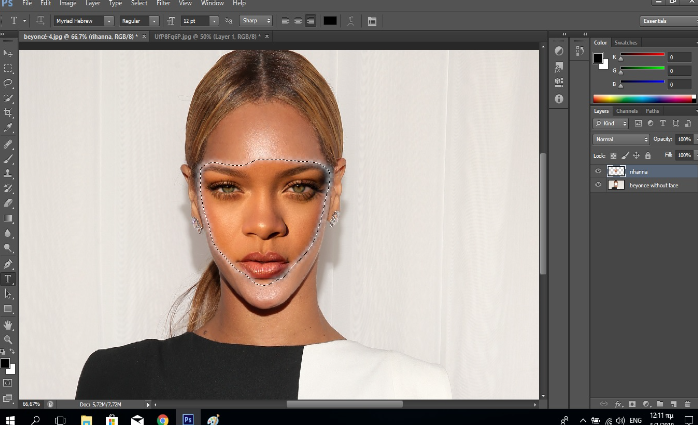
- Choose a background image and a top layer image that you'd like to blend. Be sure both pictures are the same size, then open them in Photoshop.
- All you have to do now is select the Move tool from the left icon menu, then click on the image you want as your overlay. Drag it over the photo that will become your background and then let go of both buttons. When dragging with the shift key held down, the picture is centered.
- If not, the top image will be placed at an offset. Now you should have two layers in your project, one on top of the other. If your foreground image has a transparent background, Photoshop will automatically place it on top of the layer below. If it doesn't have a transparent background, go to Layer > New > Layer from Background to create a clipping mask.
- You can accomplish this by clicking the layer mask button in the lower left corner of the layers panel, where your two image layers are shown. It resembles a camera icon with a hollow circle in the middle (it might also be a pitchfork).
- By creating a transparent Layer Mask, you can now have access to using two pictures with the option of changing which image is used for the background. To move an image up or down, simply unlock it after clicking on which image you would like to be set as the default background in Photoshop.
- With the blank layer mask box next to your overlay image selected, you can now merge by selecting the gradient tool (press G on your keyboard for quick access).
- With the gradient cursor tool, simply click at the edge of any part of the overlay image you want to replace with the background image, then drag the gradient line along until you've reached where you want the overlay image to stay unclicked.
As you can see, this method is pretty straightforward and easy to do. Not to mention, you can always adjust the opacity of your top layer image if it's too strong for your liking.
Layer opacity
Another method with which you can blend two images is by using the layer opacity option. To do this, open your images in Photoshop and make sure they're the same size.
- With your images now in layers, where the background is one layer and the image you want to merge is on top, select the top layer by clicking its thumbnail in the layers panel. You can then play with its opacity. You can find it just to the right of the Blend Modes box in Photoshop's lower right panel, and it may be altered with a tiny slider from 0% to 100%.
- You can modify the overall appearance of your combined images by changing the Blend Modes and opacity levels while any of them is turned on on the layer you're working with. The easiest way to do this is to hold Alt (Option on Mac) and click between the desired layer and the one below it. If you want to keep your changes, press Enter or double-click the icon in the Layers panel.
- You can also use a layer mask with the opacity option. Simply create a clipping mask as we did before, then add a black-and-white gradient map to the topmost layer. This will give you more control over how the images are blended together.
- If you want to have complete control over how your images are merged, you can use Photoshop's pen tool. This gives you the ability to hand-draw paths around objects so you can precisely determine how they're combined.
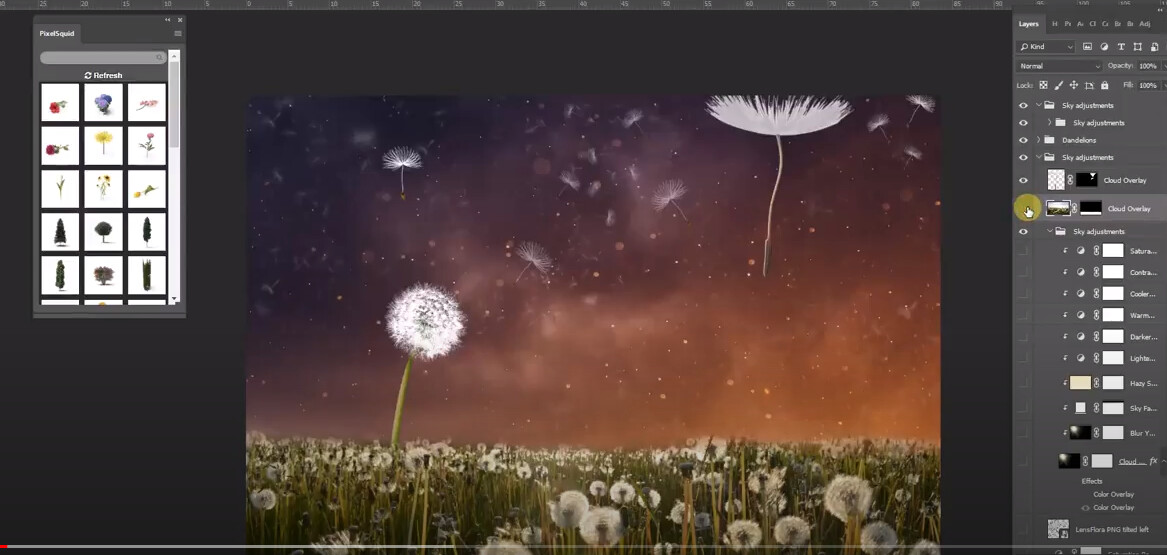
- If you want to get really creative, you can use Photoshop's layer styles to add some fun effects to your image. Layer styles are located in the left panel and can be found by clicking the "fx" icon at the bottom of the Layers panel.
- There are a ton of different layer styles to choose from, so experiment until you find something you like. You can also stack multiple layer styles on top of each other to create even more unique effects.
- Finally, if you want to save your work, go to File > Save As and choose a file format that supports layers (PSD or TIFF). This will allow you to come back and make changes later if you need to.
Blend method
One of the easiest methods for blending two images is by using the Blend Mode option in Photoshop. To do this, open your images in Photoshop and make sure they're the same size.
- You can now drag the second image on top of the first, as instructed in method one. If you want to change which photo is your overlay image, simply switch the layers around in the Layers panel. The changing order will show different images as being on top.
- After you've chosen an overlay image, you can select one of several blend modes from the Layers menu on the right near the Opacity slider. Experiment with any of these settings to determine which one works best for you.
- Quickly cycle through the Photoshop blend modes by pressing V to activate the move tool, holding down Shift, and then pressing + or – on your keyboard. It's a good idea to try out each of these options to see which one gives you the result you're looking for.
- You can also use the Opacity slider to control how much of each image is showing through. A lower opacity will make the top layer more transparent, while a higher opacity will make it more opaque.
- If you want to have complete control over how your images are merged, you can use Photoshop's pen tool. This gives you the ability to hand-draw paths around objects so you can precisely determine how they're combined.
- If you want to get really creative, you can use Photoshop's layer styles to add some fun effects to your image. Layer styles are located in the left panel and can be found by clicking the "fx" icon at the bottom of the Layers panel.
- There are a ton of different layer styles to choose from, so experiment until you find something you like. You can also stack multiple layer styles on top of each other to create even more unique effects.
- Finally, if you want to save your work, go to File > Save As and choose a file format that supports layers (PSD or TIFF). This will allow you to come back and make changes later if you need to.
With these 3 methods, you will definitely merge 2 images in Photoshop and have a lot of fun too! If you have any questions, please let us know in the comments below.
Final words
When you know how to blend two images in Photoshop, you can create some really stunning and realistic images. Whether you want to make a photo montage or simply combine two photos for a more dramatic effect, Photoshop's blend modes are the perfect tool for the job. Just remember to experiment with the different settings until you find the right look for your project. And don't forget to save your work in a format that supports layers so you can make changes later if needed.